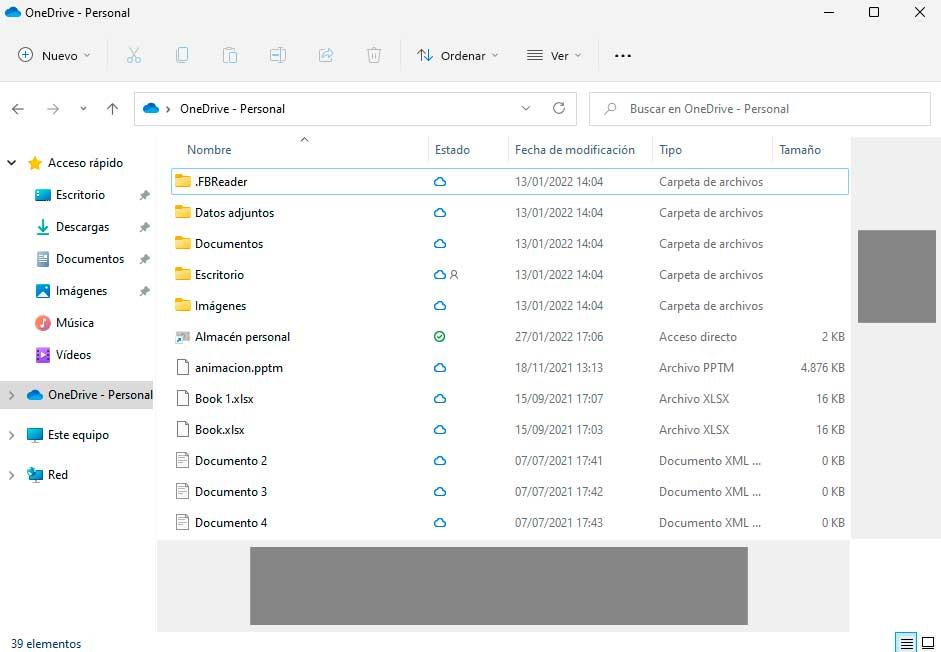
A clear example of use is when we open the File Explorer. If it is enabled, it offers us the possibility of performing a vertical scroll in the left panel, where the options through which we can navigate are shown. For its part, the right panel shows all the content that we can find horizontally or vertically depending on the view that we have established and the size of the window.
Make it visible and hide
As we have discussed, the Windows 11 scroll bars are hidden when not in use to avoid distractions. On the other hand, if we prefer to always have them in sight, there is a very simple way to activate them.
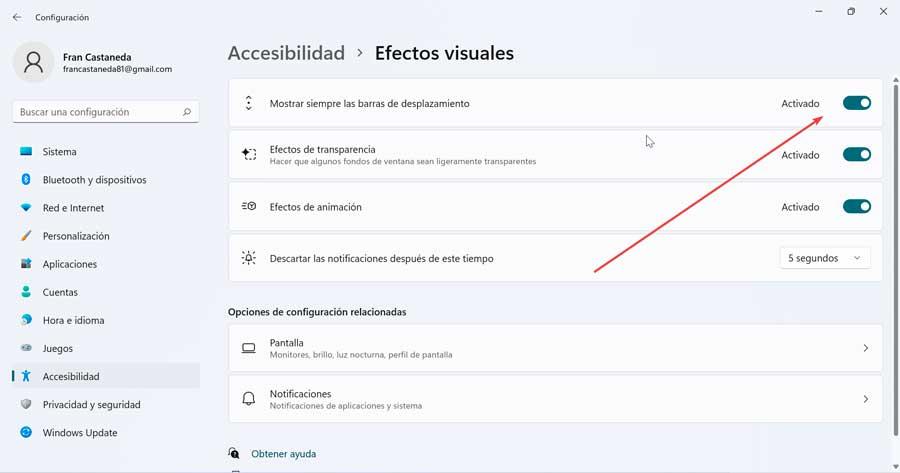
To do this, it will be necessary to access the Configuration menu, for which we press the key combination «Windows + I». We can also access it by right-clicking on the start button, which will open the WinX menu and from there we select it. Once inside, click on the “Accessibility” section that we find at the bottom of the menu on the left. Later in the menu on the right, we click on “Visual effects”.
This will show us a new screen, and at the top we find the option of “Always show scroll bar”. For this reason, it will only be necessary to click on the gray button so that it turns blue and the “Activated” message appears. Once this is done and automatically, the bars will remain fixed in all windows, unless some application manages its own scroll bars independently.
In the event that we want to remove them again, simply repeat the previous steps again and when you click on the blue button, it will turn gray and display the “Deactivated” message.
Adjust the width of the bar
In addition to being able to enable the use of these bars, it is likely that we could also find it interesting to be able to customize them, such as, for example, resize. Above all, if we have vision problems, we may want the bars to be wider. On the other hand, if we use small screens, with low resolution, or large screens, it may bother us to have several windows visible, since it may be too wide for us.
The truth is that despite Microsoft gradually evolving in the customization options of its operating systems, the truth is that it is still not as customizable as most users would like. That is why, as in Windows 10, it is not possible to change and adjust the size of the scroll bar of the windows, at least in a simple way from the Settings menu.
And it is that, despite the fact that in the Configuration menu we do not have this option, we can carry it out, making a small change in Registry Editoras we will see below.
Resize it’s height and width
In order to make this change in the system configuration, we must enter the Editor. This is something that we will do by pressing the “Windows + R” key combination, which will launch the “Run” command. Here we will write regedit and press Enter or the OK button.
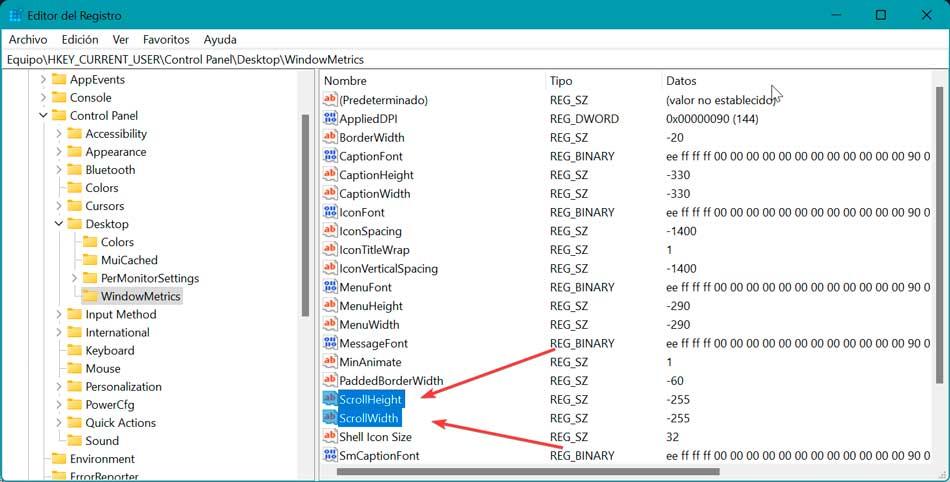
Once inside the Editor, we navigate to the following route:
HKEY_CURRENT_USER / Control Panel / Desktop / WindowMetrics
Subsequently, within the panel on the right we must locate two values: ScrollHeight Y ScrollWidth, which are responsible for modifying the values we need to make the bar wider or narrower according to our needs. By default, both have a value of -255, so we have to play with them to get the desired width and height for the bars.
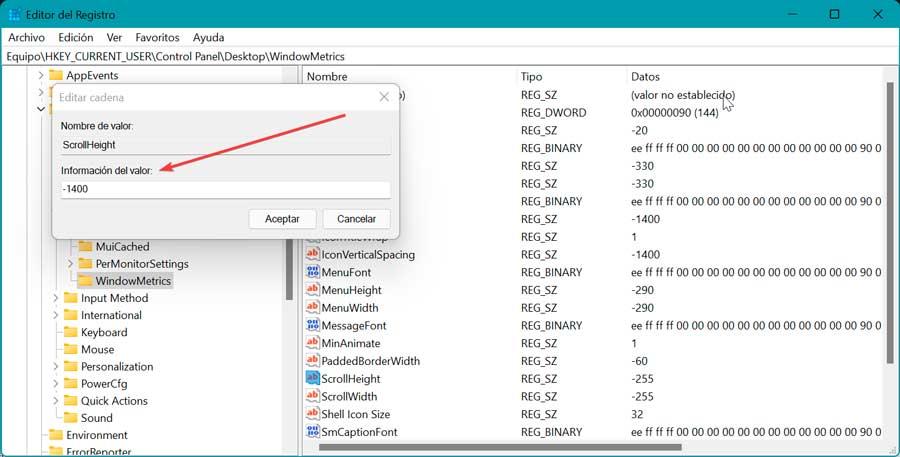
Surely we will think, where does this value come from? Well, the -255 that they incorporate by default is obtained by multiplying -15 by the value in pixels that we want the bar to have. So, in default mode, -255 is obtained by multiplying -15×17. If for example we want this bar to have a thickness of 30 pixels, we must multiply -15×30 =-450. If we want it thinner, 10 pixels, we multiply -15×10=-150. It will only be necessary to double click on each entry and change the number in the «Value information».
Of course, we must take into account the maximum and minimum values that these inputs admit, since the minimum value will be from -120 so that the bar is as thin as possible, while the maximum value reaches the -1500becoming in this case abusively thick.
Once the relevant changes have been made in the ScrollHeight and ScrollWidth entries, we will close the Editor and restart Windows. Once it has booted up again, we open File Explorer and we can check the new size of the scroll bar.
Return to its original size
It is possible that at first it will be difficult for us to find the desired size for the bar, not in vain it is difficult to know in a real way the pixel equivalence with respect to its final appearance. That is why, we can always go back to the Registry, change the values in the two entries and restart until we find the desired width and height for the scroll bar.
If we don’t like any size and we want to return to its original configuration, all we have to do is set the negative value -255 again in the ScrollHeight and ScrollWidth entries, restart the computer and open the Explorer to verify that everything has returned to the way it was at first.
This trick that already existed in Windows 10 can be used without fear in Windows 11 and it works perfectly. Likewise, we can always make a backup copy of the Registry before starting to restore it in case we make unwanted changes.
