Not in vain, Windows 10 has been with us for more than five years, so a large part of its errors and problems have been solved over time. Also note that, Microsoft has offered support until 2025so we can still continue to use it without fear for the next three years.
Along with all this, it is worth mentioning the high hardware requirements that Windows 11 requires, needing for its operation the double the RAM and disk space than its predecessor. Despite new features such as Widgets, game mode and Android compatibility, they may not be attractive enough to bet on the change.
Steps to stop auto update
While Microsoft promises that Windows 11 will not be forcibly updated on our Windows 10 computer, who knows if this will change in the future, so we can forcefully block it. For this we can use the Windows Update section, the Registry Editor or the Group Policy Editor.
Temporarily block Windows Update
The easiest way to temporarily block the Windows 11 update is to delay the download and installation from Windows Update. To do this, we access the Settings menu by pressing the keyboard shortcut “Windows + I”. Later we click on “Update and security” at the bottom and Windows Update in the left side menu. Here we find the option “Pause updates for 7 days”so they are blocked during this period.
Likewise, it is possible to configure this value by clicking on the “Advanced options” section. This will open a new window where we must locate the section of “Pause updates”. Here we can configure it so that the update stops up to 35 days. Later it will be necessary to obtain the new updates before being able to pause it again.
Use the Policy Editor
Another way to block Windows 11 from downloading is through the Policy Editor. This tool is only available for the Pro, Enterprise and Education versions of Windows 10, so if we use the Home version we will not be able to use it.
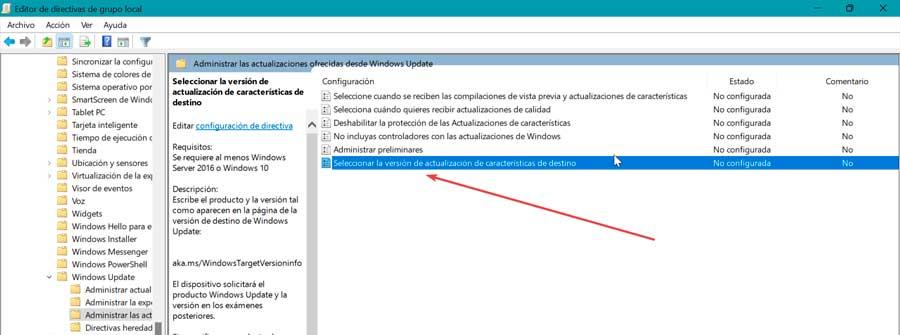
To open the Editor, we press the keyboard shortcut “Windows + R”, which will launch the Run command. Here we write gpedit.smc and press Enter or the OK button. Later we navigate to the following address:
Configuración de equipo / Plantillas administrativas / Componentes de Windows / Windows Update / Administrar las actualizaciones ofrecidas en Windows Update
Once here, we double click on the entry “Select the target feature update version”.
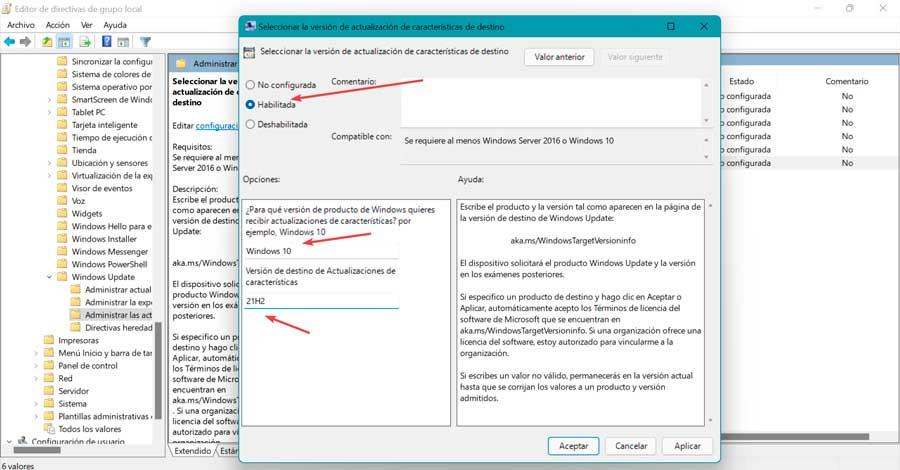
In the new window we select “Enabled” which will activate the “Options at the bottom” section. Here we set Windows 10 for the first option and 21H2 for the second.
Finally we click on “Apply” to save the changes and on “OK” to close the dialog box. We close the editor and restart the system for the changes to take effect.
Disable Windows Update service
It is also possible to block the Windows 11 update by disabling the entire Windows Update service. But keep in mind that it will also prevent the system from performing feature and security updates.
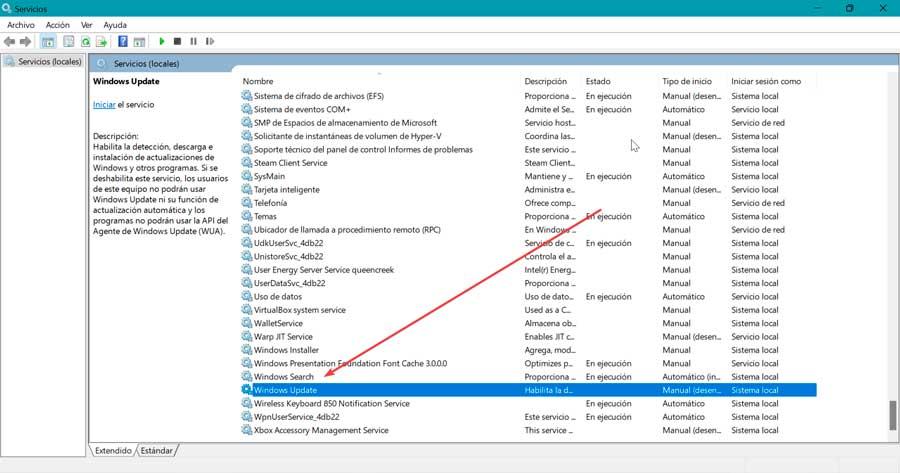
To run it, press the key combination “Windows + R” and launch the Run command. Here we write services.msc and press Enter.
Next, in the list of services we double click on «Windows Update».
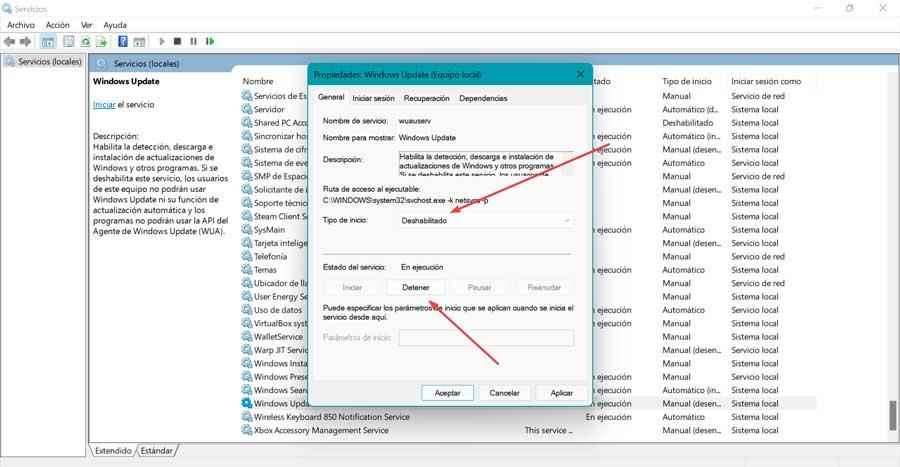
This will cause a new popup to open with its properties. Here in the “General” tab, we go to “Service status” and click on the button “Stop”. Now, in the “Startup type” dropdown menu we select “Disabled” and click the Apply button to save the changes.
This will stop all updates, including Windows 11. When we want to activate them again, we just have to perform the same steps and select “Automatic” or “Manual” and click on Apply.
From Registry Editor
Finally, we can choose to use the Registry Editor to block the update to Windows 11. To do this, we use the keyboard shortcut “Windows + R” to launch the Run command. Subsequently, we write regedit and press Enter or the OK button to start it.
Before modifying anything, we will make a backup, as a preventive measure. To do this, click on “File” and “Export”. We then specify All in the export range, give it a name, select the .reg format, and click Save.
Next, we navigate to the following route:
HKEY_LOCAL_MACHINE / SOFTWARE / Policies / Microsoft / Windows / WindowsUpdate
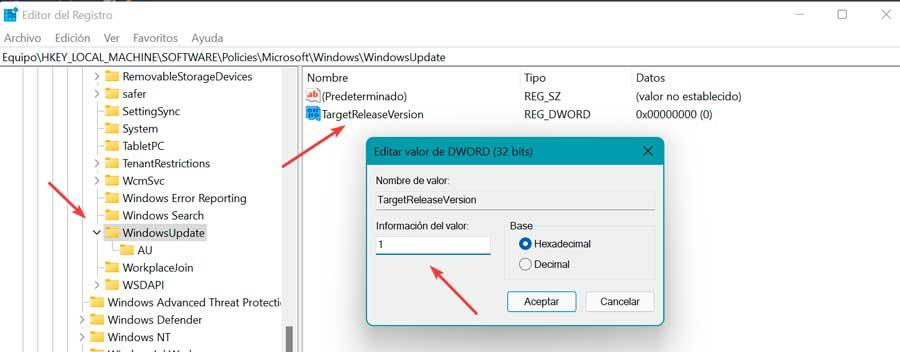
Once here, we must locate the registry value TargetReleaseVersion. If it doesn’t exist, we create it. To do this, we right-click on a blank space and select “New” and “DWORD (32-bit) Value” and give it that name. Then we double click on it and give it the value «1».
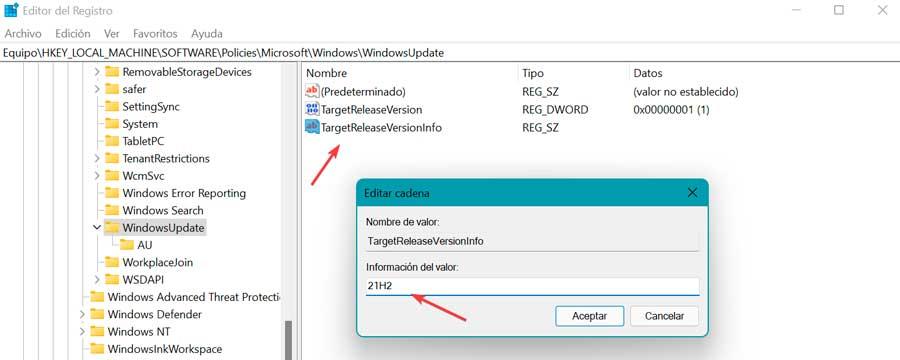
We then look for the value called TargetReleaseVersionInfo. If this does not exist, we create it by right-clicking on a blank space and selecting “New” and “String Value”. Then we double click on it and indicate the version in which we want to stay, such as 21H2.
All that remains is to restart the PC and from now on Windows 10 is configured to always stay in version 21H2 and we avoid receiving new versions of the operating system by mistake. When we want to update, it will only be necessary to delete the two entries created and look for the update in the Windows Update section.
How to block the following versions
If we have decided that we are going to continue using Windows 10 for a long period of time and we do not like to be constantly updating the equipment with numerous patches, we also have the possibility of prevent upgrading to later versions. This is something that can be useful if we only care about, say, big updates, so if we already have the 21H2 update, we can block it and tell the OS that we want to stay on it.
To do this, simply access the Windows 10 Registry Editor and navigate again to the address:
HKEY_LOCAL_MACHINE / SOFTWARE / Policies / Microsoft / Windows / WindowsUpdate
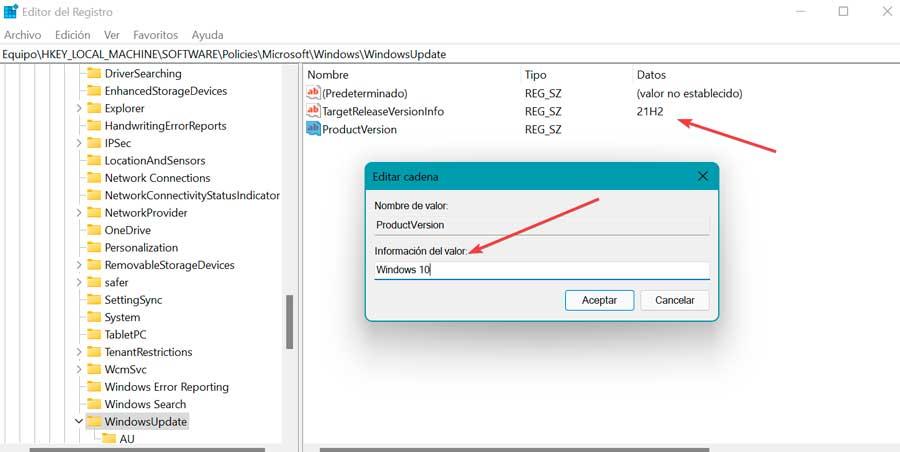
On this occasion we must create a new value that we will call ProductVersion and edit it so that it has a value of “Windows 10”. Likewise, we must have created the value TargetReleaseVersionInfo with the data value “21H2”.
All that remains is to close the Editor and restart for the changes to be applied correctly. In this way, Windows 10 will stay in version 21H2 and update until we vary it later.
